Help - How Your Data Fits Together

Getting Started

How Your Data Fits Together

The mental model behind Designer Den: account, projects, components, files, setups, rooms, and hands, and what persists where.

How Your Data Fits Together

A few minutes here will save you a lot of confusion later. Designer Den has a clear structure, and once you can picture it, questions like "why didn't my card update?" and "where did my table go?" answer themselves.
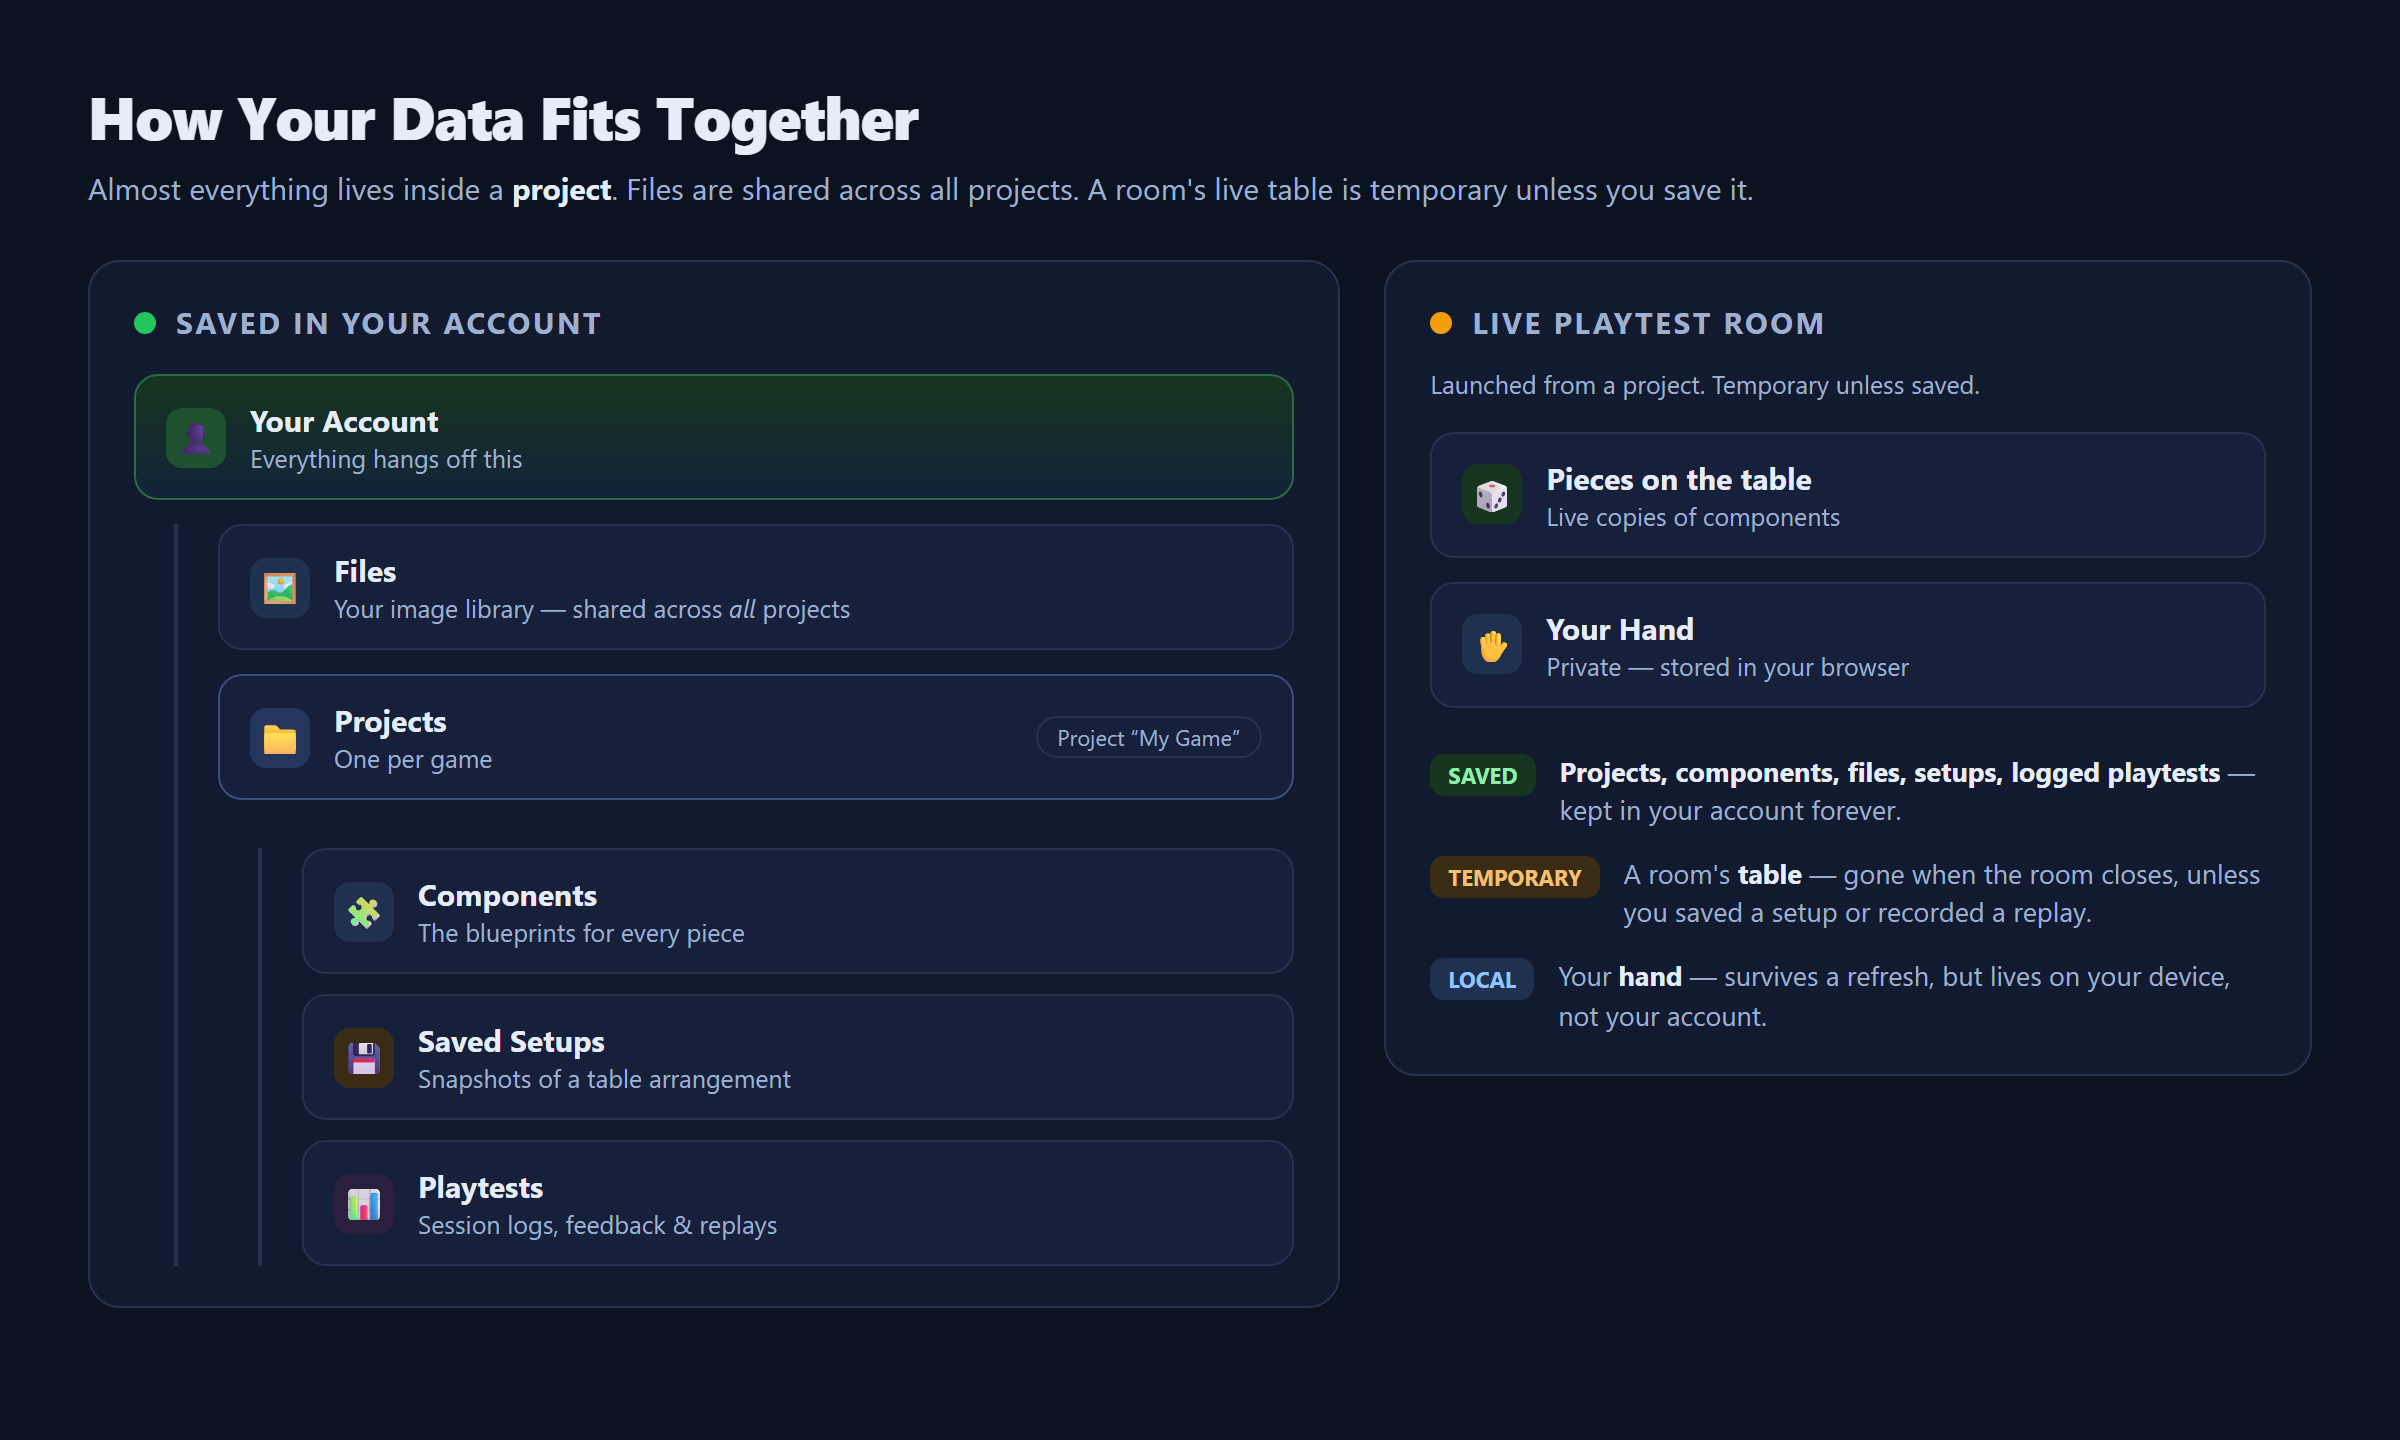
Almost everything lives inside a project. Files are shared across all projects. A room's live table is temporary unless you save it.

Saved in your account

Your AccountEverything hangs off this
FilesYour image library, shared across all projects
ProjectsOne per game Project "My Game"
ComponentsThe blueprints for every piece
Saved SetupsSnapshots of a table arrangement
PlaytestsSession logs, feedback and replays

Live playtest room

Launched from a project. Temporary unless saved.

Pieces on the tableLive copies of components
Your HandPrivate, stored in your browser
Saved
Projects, components, files, setups and logged playtests are kept in your account forever.
Temporary
A room's table is gone when the room closes, unless you saved a setup or recorded a replay.
Local
Your hand survives a refresh, but lives on your device, not your account.

Everything hangs off your account. Almost everything else lives inside a project. The one exception is Files, your image library, which is shared across all your projects so you can reuse art anywhere.

The Levels, One by One

Projects

A project is the home for a single game. It holds that game's components, saved setups, and playtest history. Keep each game (and each expansion) in its own project. See Projects.

Components are blueprints

A component is the master definition of a piece: its name, image, size, and so on. It is a blueprint, not a physical thing on a table. Building components is how you describe your game. See Components.

The table holds live copies

When you spawn a component in a room, you create a live copy of that blueprint on the table. You can move, flip, and rotate that copy freely.

Important

Editing a blueprint does not change copies already on the table. Update a component's art in the library and the pieces you already spawned keep the old art until you sync them or spawn fresh ones. This is the single most common point of confusion. The fix is in Editing & Syncing Components.

Files are shared art

Files is your account-wide image library. Upload art once and reuse it across any project's components. See My Files.

Saved Setups remember the table

A saved setup is a snapshot of a whole table arrangement, every piece's position plus the camera, stored in the project. It's how you reopen a game already laid out instead of building it each time. See Saved Table Setups.

Playtests record what happened

When you play, sessions are logged to the project: duration, the action log, player feedback, and (optionally) a full replay. See Playtest Analytics and Session Replay.

How a Component Renders

There's a second hierarchy worth knowing: the one inside a single piece. Several settings stack on top of each other, and knowing the order explains most "why can't I see my image?" moments.

From the bottom up:

The four layers of a component face Drawn bottom to top, one face at a time: front or back, never both.

Top of the stack

4 Mask Clips everything below into a shape. Cards use a Card Shape Mask, tokens a Token Shape.
3 Marks, labels & stickers Drawn marks, then attached text labels, then stickers on top. All three ride the piece and belong to the face they were added on.
2 Image The artwork for the face that is showing, sitting on the colour.
1 Colour & opacity The fill, with its own 0-100% opacity. It shows anywhere the image does not.

Bottom of the stack

The same face, built up

Colour only
Image on the colour
A mark added
Masked to a circle

The mask clips the whole stack, so it cuts the colour fill, the artwork and the marks together rather than the artwork alone.

What opacity does to layer 1

100%: a solid fill behind the art
0%: the art alone, table showing through

Same component, same artwork. Only the colour layer's opacity changed, which is why it is worth checking before the image when a piece looks wrong.

What Use Image as Mask does to layer 1

Off: the colour fills a shape behind the art
On: the same colour tints the art itself

With it on there is no shape to fill: the artwork's own outline becomes the piece, so the colour lays over the art as a tint. Its strength is that colour's opacity.

1. Color layer. Each face has its own color and opacity. The color is the fill, so it shows anywhere the image doesn't: when there's no image at all, through the transparent parts of a PNG, and in the corners a mask cuts off. At 0% opacity you see only the image. See Color & Opacity.

2. Image. The image for the face currently showing sits on the color layer. Front image and color show when the piece is face-up, back image and color when it's face-down. A piece with no back image falls back to its back color, which is the usual way to give a deck a uniform back.

3. Markers and labels. Anything drawn on a piece with the marker tool, and any text labels attached to it, render above the color and image. Labels sit above markers, and stickers sit above both. All of them ride the piece: they move, rotate and scale with it, and they're tied to the face they were added on, so a mark made on the front doesn't show through to the back.

4. Mask. The mask is applied last and clips everything above into a shape: the color fill, the artwork, and the marks alike. Cards use a Card Shape Mask, tokens use a Token Shape. See Shapes & Masks.

Tip

Use Image as Mask changes step 4. Instead of clipping to a preset shape, the artwork's own transparency cuts out the piece, which is what you want for die-cut art, meeples and standees. The color layer then tints the artwork rather than filling a shape behind it.

Each of these controls is covered in full, with the per-type differences, in Component System.

You aren't limited to the built-in shapes. You can draw your own in the Custom Mask Editor, and because masks are matched by name, a custom mask named to match one your import expects (a Dextrous mask name, for example) is picked up automatically. Create the mask first, then run the import. Mask names are unique per designer, so a name always points at exactly one mask.

What Persists, and What Doesn't

This catches people out, so it's worth stating plainly:

  • Saved forever (in your account): projects, components, files, saved setups, and logged playtests.
  • Live and temporary: a room's table. When the room closes, the arrangement is gone unless you saved it as a setup (or the room is a persistent Pro room, or you recorded a replay).
  • Local to your browser: your private hand. It survives a refresh, but it lives on your device, not in your account.

Free vs. Pro Limits

The structure is the same on both plans; Pro mainly lifts the ceilings.

Level Free Pro
Projects 2 Unlimited
Saved setups (per project) 1 50
File storage 100 MB 1 GB
Storage Add-ons (optional, from $2.50/mo) +5 to +20 GB each, stackable +5 to +20 GB each, stackable
Players per room 6 10
Saved replays (per project) No 25 (others expire after 7 days)
Persistent rooms & public setup sharing No Yes

Full details and how to upgrade are in Plans & Pricing.


Related: Saved Table Setups · Editing & Syncing Components · Plans & Pricing